Celebrate Independence Day with a touch of rustic charm by creating your own DIY Wooden American Flag and 4th of July bunting! This handmade decors add a patriotic and timeless feel to your home, whether displayed indoors or outside for a festive gathering. With just a few materials and some creativity, you can craft a beautiful wooden flag along with a classic fabric bunting to enhance your 4th of July decor. This step-by-step tutorial will guide you through the process, making it easy and enjoyable for crafters of all skill levels. These DIY 4th of July decorations were shared by Kenneth Wingard on Home & Family which airs weekdays at 10 am on the Hallmark Channel. I was given permission to share these DIY 4th of July decorations with you here.
DIY 4th of July Decor
DIY 4th of July décor is a fantastic way to add a personal, budget-friendly, and festive touch to your celebration while embracing creativity. Handmade decorations, like painted mason jars, patriotic wreaths, and star-spangled banners, allow you to customize your space with unique designs that reflect your style. Plus, DIY projects can be a fun bonding activity for families, helping kids and adults alike get into the holiday spirit. Using recycled or repurposed materials from a wood pallet also makes it an eco-friendly choice, reducing waste while still bringing plenty of red, white, and blue flair to your festivities.
You will love this fun DIY 4th of July decor from Ken Wingard. The Wooden American Flag And 4th of July Bunting will look great all by themselves or make an even bigger effect together. Add some patriotic pillow throws to your chairs and serve some red, white, and blue treats, and you will be feeling festive in no time! Get ready to show off your patriotic spirit with these DIY projects that are perfect for celebrating the 4th of July!
DIY Wood American Flag- Perfect 4th of July Decoration!
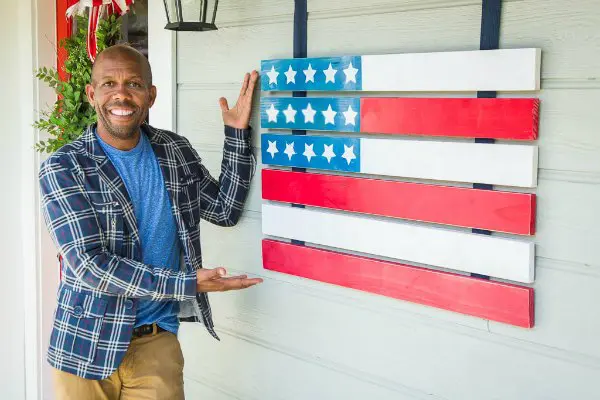
Ken Wingard also shared with us how to make a DIY Wooden American Flag. This DIY 4th of July decor project is a little more involved but still easy for even a beginning DIY crafter to manage. To make your own American Wooden Flag, you will need six 36″ long boards (such as old 1″x3″ or 2″x4″s or pallet boards), 2 pieces of 2” wide webbing that are 30” long each (Country Brook Design offers great options), Grommets, Paint, Staple gun, and Sandpaper. This DIY Wooden American Flag is a unique 4th of July Decoration that will last and look great year after year.
How To Make A Handcrafted Wooden American Flag:
Here are the step-by step directions, but you basically paint the boards, and attach them to the webbing, add grommets to the webbing, and hang!
- Paint 2 boards red and 1 board white.
- Paint 16” of the other three boards blue and paint the remaining 20” of 1 board red and the other 2 white. (see photo above)
- Cut a star stencil and use it to spray paint 5 stars on the blue section of the three boards. (The simplified star design gives it a bit of a rustic look and makes it easier to do.)
- Place a grommet ½” from one end of each piece of webbing. You will use these to hang the flag.
- Lay the boards face down in the order of a flag with ½ inch between each board.
- Lay the webbing perpendicular across the boards, 6” in from the outer edges, lining up the non-grommeted end of the webbing at the edge of the bottom of the flag.
- Staple the webbing to each board, using a staple at both the top and bottom of each board.
- Your DIY Wooden American Flag is all done and ready to hang.
This American wood flag makes fabulous 4th of July decor that you can make yourself. I love that it is high quality enough to use year after year to American pride for any patriotic holiday or event. It can also make a perfect gift for military veterans.
DIY 4th of July Bunting
Copyright 2014 Crown Media Family Networks/Photographer: Jeremy Lee
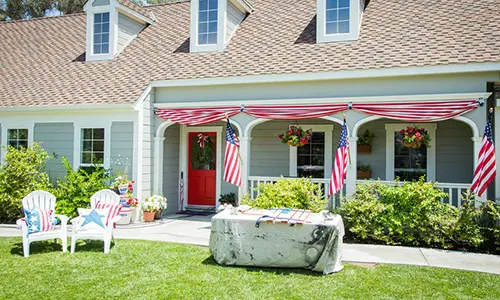
I love this simple and elegant 4th of July Bunting! Ken Wingard shares with you just how you can make your own 4th of July Bunting easily just using fabric, grommets, webbing, and a few screws! He simply uses striped fabric as bunting. Then, he adds grommets to the fabric and to the navy webbing to make the bunting last time after time. It also gives the DIY project a beautiful polished finish. He also used silver foam stars to cover the fabric gatherings for the final 4th of July decor touch.
How To Make Bunting For The 4th of July
- Buy a length of awning red and white stripe fabric. It should be equal to, or a bit longer than, the area you would like to hang the bunting.
- Add a grommet to top and bottom of the four fabric corners.
- Then add a grommet to the top edge at each point you want to gather the fabric. For example, every four feet.
- Cut the webbing into 12” lengths and insert a grommet into each end. These will be used to gather the fabric for bunting and look pretty.
- Place a nail where the bunting will start and finish. Also place one at each point where the bunting will be gathered.
- Hang one end of grommeted webbing on each nail.
- Then hang the first corner of fabric and the bottom corner of fabric. Next, hang the other end of webbing. Finish by adding a silver star on top for each nail.
- Your bunting is all done and ready to show off!
I love DIY decorations that look classy and can be reused. This 4th of July Bunting fits that bill and it is a wonderful addition that is easy to make.
Conclusion
A wood American flag is more than just a decoration; it’s a meaningful symbol of patriotism that can be used in various ways to honor your love for the country. Whether it’s displayed as a statement piece in your home, hung on your porch for national holidays, or incorporated into a DIY project like a mantelpiece or wall art, it adds a rustic, heartfelt touch to any space. Its timeless appeal also makes it a great gift for veterans, military families, or anyone who appreciates American heritage. With its versatile and lasting nature, a classic wooden American flag serves as a constant reminder of pride, freedom, and the values that bring people together.
I love watching Ken work. He has such great ideas and actually doable do it yourself projects, like these 4th of July Bunting and DIY Wooden American Flag. Which is your favorite DIY 4th of July decoration project?
Related Posts:
DIY Patriotic Windsock Craft For Kids
DIY July 4th Banner: How To Make An Easy Paint Chip Pennant


