Do you have teenagers who want to give gifts to ALL of their friends this Christmas but don’t realize how much cash that could take? I was that teen who just couldn’t leave anyone out and had to give presents to each and every friend. And my sister followed in my footsteps. So, my mom always encouraged my sister and I to make something (since buying for all of our friends wasn’t in the budget). Our diy gifts ranged from homemade personalized picture frames to sweet smelling candles. One year, I received a nail kit that I just loved, and years later, I’ve decided to recreate it. This easy DIY nail manicure kit is perfect for girls of all ages and makes a great stocking stuffer.
Homemade Nail Manicure Kit Tutorial
Save money and time by creating your own DIY nail kit. Follow our step-by-step guide and create salon-worthy nails at home. No more waiting for appointments, or spending money on the latest nail trend. From the essentials to the finishing touches, we’ve got all the tips and tricks you need for achieving salon-quality nails at a fraction of the cost. This guide is perfect for beginners or anyone looking to upgrade their nail game. Here is an overview of what you will need.
Craft Supplies:
- Mason Jar
- Translucent Glitter paint (For example, FolkArt Extreme Glitter Acrylic Paint)
- Large sticky letters- optional
Manicure Kit Supplies:
- Regular nail polish or Gel nail polish
- Toe/finger dividers
- Nail file
- Nail polish remover
- Cotton balls
- Nail Clippers
- DIY Cuticle Oil and cuticle stick
What You’ll Need for Your DIY Nail Kit:
To get started on your DIY manicure journey, you’ll need a few key items to create your very own nail kit. First things first, you’ll need a good-quality nail file to shape and smooth your nails. Look for one that’s gentle on your nails and has a fine grit to prevent any damage. Next up, you’ll need a cuticle pusher to gently push back your cuticles and reveal more of the nail bed.
Investing in a good set of clippers is also essential for keeping your nails trimmed and tidy. You may want to consider purchasing a few different sizes for different nail lengths. And don’t forget a buffer block to smooth out any ridges and add shine to your nails.
Now onto the fun stuff – nail polish! You’ll want to stock up on a few different colors. You may want to try basic shades like nude, red, and pink, as well as a clear topcoat to seal in your color and add an extra layer of protection. Additionally, it’s always wise to have a bottle of nail polish remover on hand in case of any mistakes. You can find a small bottle in the travel section or at the dollar store.
And lastly, don’t overlook the importance of hand cream or cuticle oil. Regular moisturizing will not only keep your hands and nails healthy, but it will also extend the life of your DIY manicure. Now that you have your essential starter kit items. It’s time to dive into our step-by-step guide for the at-home kit mason jar gift holder.
Nail Kit Mason Jar Craft Instructions:
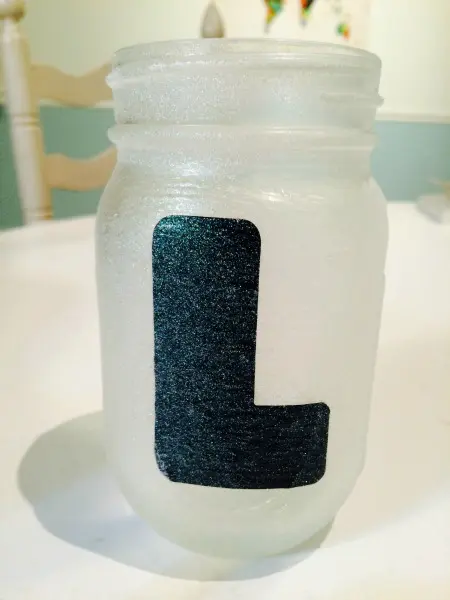
First, if you want to personalize your jar, stick on a letter. I used a sticky letter from a set I picked up at Michael’s. I used an L since my nail set is for my roommate Lauren.
Then, paint your Mason jar with glitter paint. I chose white glitter paint because it looks like snow and is perfect for this DIY Christmas gift. Allow to dry completely.
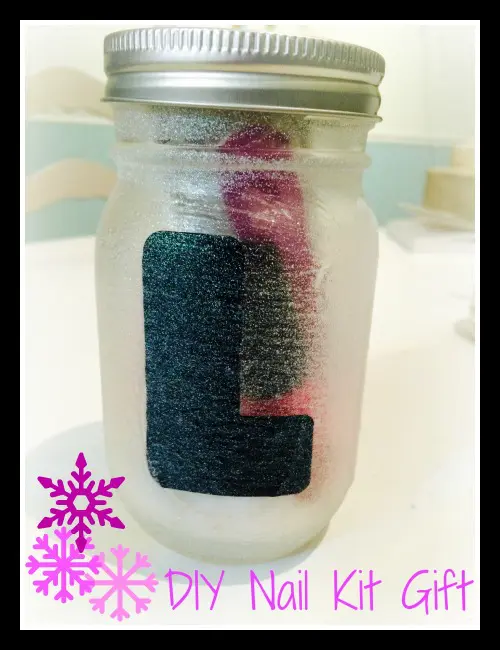
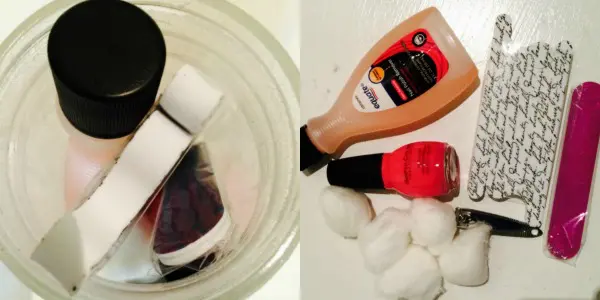
Finally, I added the nail manicure necessities. I put the cotton balls in at the base, then stacked the nail polishes and remover on top. I slid the toe or finger dividers, nail clippers, DIY cuticle oil, and nail file in last. I coordinated my colors and stuck to black, white and pink (three of my roommate’s favorite colors). You could also print up some manicure instructions if you think those would be useful.
Note: Most nail polish removers are not very eco-friendly. If you are looking to make your own nail polish remover, just mix together an equal amount of white vinegar and lemon juice. This might take longer, but it will break down the polish. Soaking your nails in warm water for 10 minutes can speed up the process. It will also help soften your nail cuticles so you can push them back easily.
You could also wrap ribbon around the top of your jar to add some festive flare. This DIY Nail Manicure Kit would also be great to gift someone with homemade foot soak if you want to make into a spa day type of gift so they could do a pedicure too!
At Home Manicure Kit Instructions
Now, here is how to use the DIY nail kit for the perfect DIY manicure at home.
Step 1: Start by removing any previous nail polish using the nail polish remover. Ensure your nails are clean and dry before moving to the next step.
Step 2: File your nails in the desired shape using a nail file. It’s important to file gently and in one direction to avoid any damage to your nails.
Step 3: Apply a small amount of natural nail cuticle oil to your cuticles and massage it in. This will hydrate and soften your cuticles, making them easier to push back.
Step 4: Gently push back your cuticles using a cuticle pusher or orangewood stick. Be careful not to push them too far back on the nail beds or damage them. Proper prep will help you achieve flawless nails.
Step 5: Apply a base coat of nail polish to your nails. This will provide a smooth surface for the color to adhere to and protect your nails.
Step 6: Apply two coats of your chosen nail polish color, allowing each coat to dry fully before applying the next.
Step 7: For best results, finish off with a clear top coat to seal in your color and add a glossy finish.
Step 8: Wait for your nails to dry completely before applying any hand cream or lotion.
By following these simple steps, you can achieve nail salon quality nails at home. However, if you’re still struggling to perfect your DIY manicure, don’t worry. Our next section will provide you with some useful tips on how to take your manicure game to the next level.

Tips for Achieving Salon-Quality Nails at Home
To take your DIY manicure to the next level and achieve salon-quality results at home, there are a few tips and tricks to keep in mind. First, always use a base coat to protect your nails from staining and to help your regular polish to adhere better. Then, apply two thin coats of your chosen polish, allowing enough time for each coat to dry. It’s better to apply two thin coats than one thick coat, as thick coats can take longer to dry and are more likely to smudge.
To ensure a smooth and flawless finish, clean up any mistakes or smudges with a small brush dipped in nail polish remover. Don’t forget to moisturize your cuticles with cuticle oil or cream to keep them healthy and prevent dryness.
Lastly, when it comes to applying topcoat, make sure to wait until your polish is completely dry before adding a layer. This will prevent smudging and ensure a longer-lasting, shiny finish.
By following these tips, you’ll be well on your way to achieving professional-looking results from the comfort of your home. And if you’re feeling creative, our next section will provide some fun DIY nail art ideas to try out!
DIY Gel Manicure
Gel manicures are a popular choice for those seeking long-lasting, chip-resistant nails with a glossy, salon-quality finish. Unlike regular polish, gel polish is cured under a UV or LED lamp, which helps it harden quickly and stay intact for up to two to three weeks without peeling or smudging. This type of manicure is ideal for busy individuals who want a durable, low-maintenance option that still looks polished and professional. With a wide variety of colors, finishes, and nail art possibilities, gel manicures offer both beauty and versatility. Proper application and removal are key to maintaining healthy nails, making it important to follow recommended steps or seek professional help if needed.
Staying on Trend: DIY Nail Art Ideas
By now, you have learned some essential tips and tricks that will help you create the perfect DIY manicure. But why stop at a simple coat of nail polish when you can take your at-home nail game to the next level with some trendy and chic nail art ideas?
One of the most popular nail art trends right now is the minimalist nail art, which involves using negative space to create simple yet eye-catching designs. You can achieve this look by applying a base coat and using a thin brush to create geometric shapes or lines in a contrasting color. Another popular trend is ombré nails, where you blend two or more colors together to create a gradient effect.
If you’re feeling a little more daring, you can try adding some glitter or metallic accents to your nails. For example, you can use a fine glitter polish to create a glitter French tip, or apply some metallic foil to your nail tips for a bold and shiny look.
There are countless nail art ideas out there, so don’t be afraid to experiment and have fun with it. And remember, practice makes perfect, so keep practicing until you’ve mastered your favorite nail art techniques.
Incorporating some DIY nail art into your manicure routine can help you stay on trend and express your creativity. So go ahead and give it a try – the possibilities are endless!
Conclusion
In conclusion, creating your own DIY nail kit is an excellent way to save money and time, without sacrificing the quality of your manicure. By following our step-by-step guide and taking advantage of our tips and tricks, you can create salon-worthy nails right at home. So why spend money on expensive manicures when you can achieve beautiful results with your own DIY nail kit? As the saying goes, “Give a woman the right nail polish and she can conquer the world.” So go ahead and conquer the world with your stunning, DIY nails!
Since I already had the Mason jar and glitter paint, this gift cost me just over $5. This DIY nail manicure kit was super simple to make. They are such a fun and useful gift to receive. Share your stocking stuffer and small gift ideas with us @familyfocusblog! And check out more Christmas crafts on our Pinterest Board.
Related Posts:

Nicole B says
A full nail kit makes a cute gift idea. I had never heard about using vinegar and lemon juice to remove nail polish. That’s a cool tip! Thanks!