Here is a step-by-step Halloween FX prosthetics tutorial. Prosthetics are basically professional quality zombie makeup that can truly bring any costume to life! Zombie clothes are a great start but the makeup is the real clincher. Whether you are adding a zombie bite or changing the look and shape of your nose, this tutorial goes over the basics of applying a prosthetic and making it look as authentic as possible.
Halloween Zombie Makeup Tutorial
Halloween prosthetics are used to enhance costumes and create realistic, dramatic, or fantastical effects. Here are some reasons why people use them:
- Realism: Prosthetics can make costumes look more authentic and believable, whether you’re aiming to be a zombie, vampire, or another character that requires a transformation.
- Creativity: They allow for a higher level of creativity in costume design, enabling people to craft unique and intricate looks that wouldn’t be possible with makeup alone.
- Detail: Prosthetics can add intricate details, such as wounds, scars, horns, or other features, that contribute to the overall impact of the costume.
Halloween Prosthetics Supplies:
- Prosthetic piece
- Spirit gum
- Liquid latex
- Tissue or toilet paper
- Foundation
- Grease paint
- Makeup sponges
- Fake blood
You can find FX prosthetic kits like the one through my affiliate Amazon link which have most of the supplies you need. You can get one with wax and make your prosthetics or you can get latex prosthetics.
How To Do Zombie Makeup With FX Prosthetics:
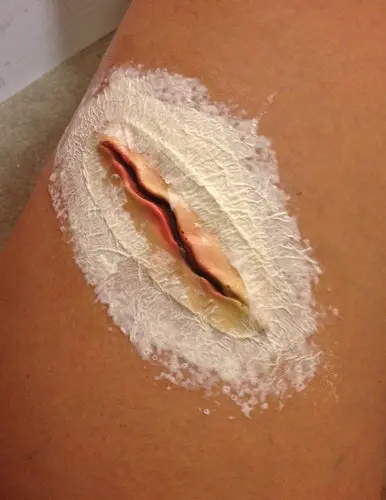
- First, chose a spot to place the prosthetic and cleanse the skin. Once you have done this, you can either outline the area on your skin using a white eyeliner and brush a layer of spirit gum directly onto the skin or you can just apply the spirit gum to the prosthetic. Make sure the entire area has a layer of spirit gum.
- Place the prosthetic onto the skin and hold.
- Once the spirit gum has dried you can do one of two things to make your prosthetic look as real as possible.
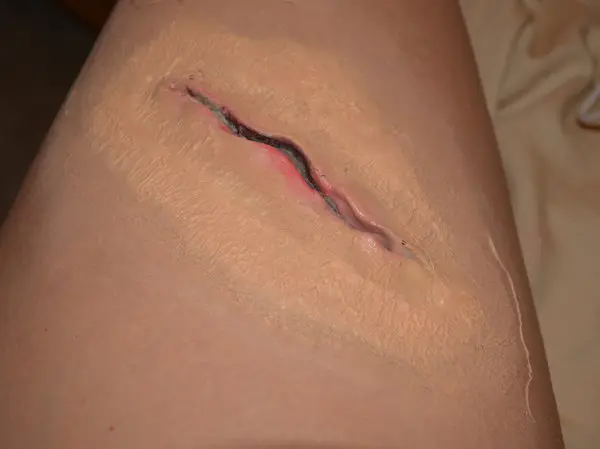
- If you have made your own or purchased a good quality prosthetic then blend the edges of the piece using liquid latex layers. Make sure you let each layer dry before applying another layer.
- If you have purchased a prosthetic with thick edges that will not blend well with liquid latex only then you will need to use tissue or thin toilet paper.
- First, add a few layers of liquid latex to the edges of the prosthetic and your skin. Then add thin layers of tissue or toilet paper as you see fit.
Once you have the prosthetic blended with your skin it is time to add makeup!
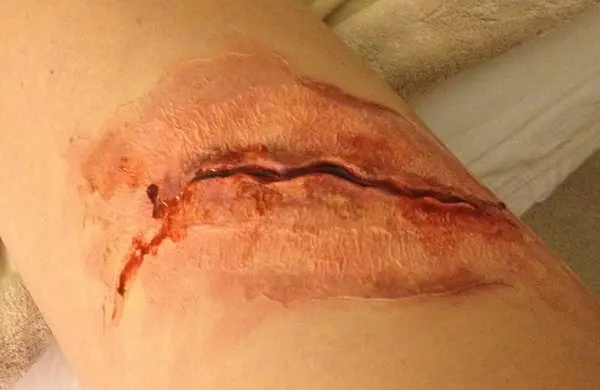
Take a liquid foundation that matches your skin tone and go over the edges, liquid latex and tissue.
Next, build up layers of reds, purples, and black for effect. Depending on the prosthetic and the look you are going for this step is optional.
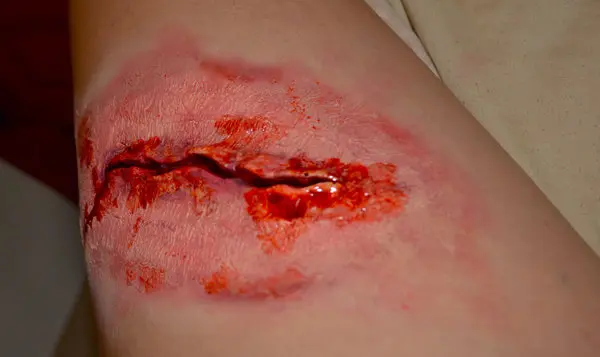
What is a prosthetic without some fake blood? I added some to the middle of my prosthetic to give the slash wound an authentic look. Have fun being creative!
Conclusion
Zombie prosthetics are particularly popular for several reasons. Zombies are often depicted with decayed flesh, exposed bones, and various injuries that are difficult to replicate with makeup alone. Prosthetics help create a more lifelike and terrifying appearance. Realistic zombie prosthetics can make the character more frightening and convincing, which is especially important for Halloween events, haunted houses, or horror-themed parties. While makeup requires skill and time to achieve the same level of detail, prosthetics can be easier to apply, providing a ready-made solution that can be adhered to the skin with adhesive. Have fun with it!
Do you plan to use this for a Halloween zombie costume or some other character? Have you ever used prosthetics? Will you be using prosthetics this Halloween? If you do, be sure to share your creations with us @familyfocusblog!
Related Posts:
Halloween FX Wound and Burn Makeup Tutorial