I am so excited to share with you an adorable DIY photo banner tutorial today. It was easy to make and the materials were mostly things I had around the house. Your photos really personalize the banner and make it a cute keepsake. This craft comes out looking stylish enough that you will enjoy using it as holiday home decor year after year.
Creating a photo banner can serve various purposes and has several benefits. Photo banners provide a personalized touch to your space. They allow you to showcase meaningful memories to celebrate special occasions and milestones such as birthdays, weddings, anniversaries, graduations, or even just a family gathering. They serve as a visual representation of cherished moments.
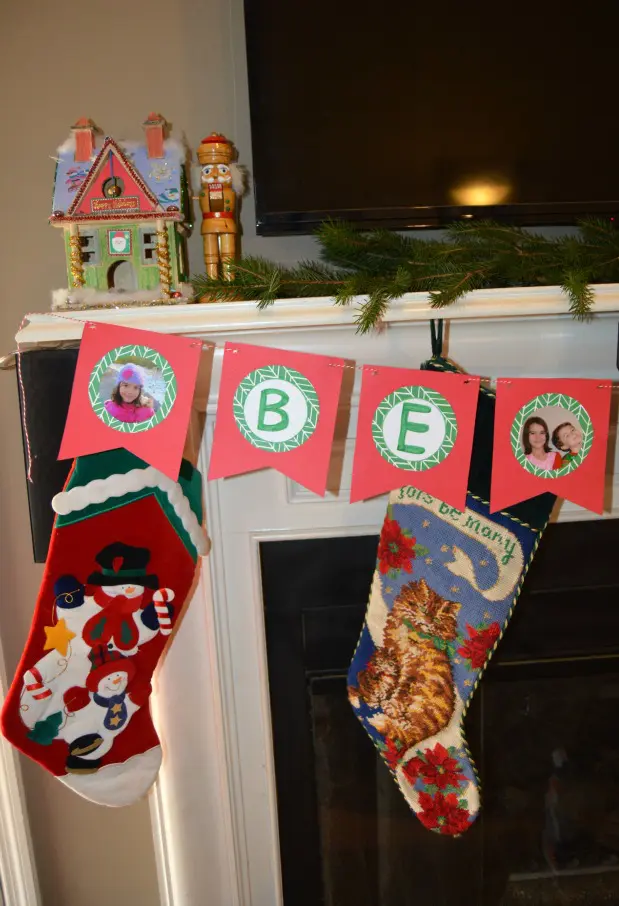
This DIY Banner Is A Fun Idea For Photo Holiday Home Decor
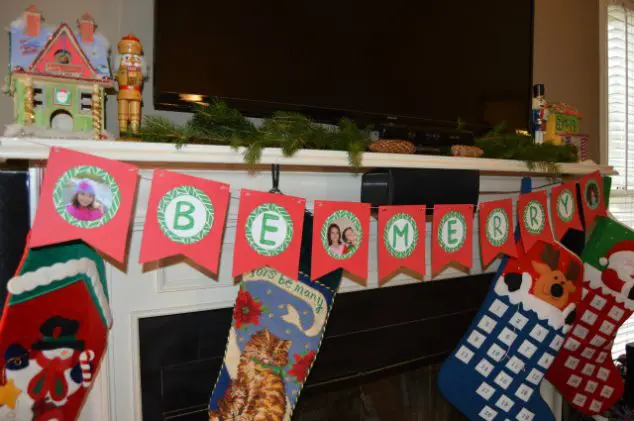
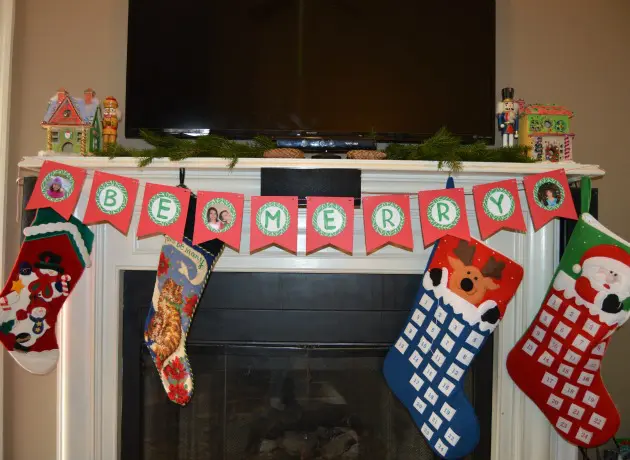
A little over a week ago, I made my holiday cards and I had extra photos that I liked printed up as well so that I could make some fun photo holiday home decor. I came up with three fun ideas but I decided to go with a DIY photo banner to add some holiday cheer to my mantle. This banner tutorial uses basic materials so that you can work on this diy project without having to go shopping at a craft store. I am quite pleased with the results! This banner will cover a space between 50-65 inches depending on how far apart you spread your banner pieces. The mantle in the image here is about 63 inches. You can always add extra photos on the ends if your mantle is larger. Also, here are some fun Christmas Mantel decor ideas to compliment your banner.
Making a DIY photo banner is surprisingly easy and only requires a few basic supplies. With just some printed photos, string or twine, hole punch, clothespins, or tape, and a pair of scissors, you can create a charming display in minutes. It’s a simple yet personal way to decorate for parties, holidays, or special occasions.
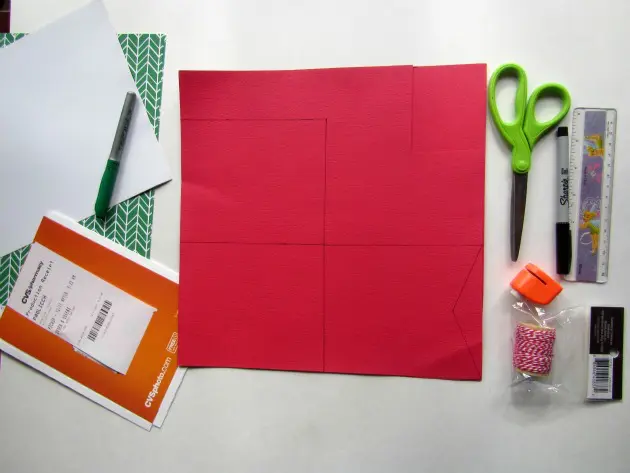
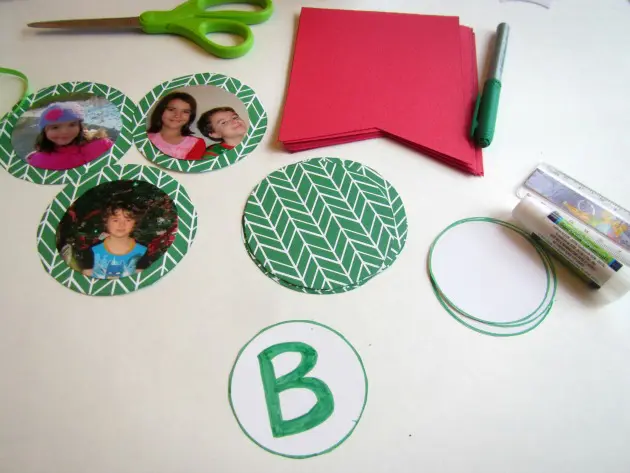
Craft Supplies For DIY Photo Banner:
- 3 sheets of red scrapbooking paper
- 2 sheets of printed scrapbooking paper (I used a green pattern close to chevron.)
- sheet of white typing paper
- photos (You need 3 for this banner but you may want to have extras on hand to choose ones that fit your circle best.)
- scissors
- marker
- ruler
- glue stick
- hole punch
- string
- cup for tracing or protractor
How To Make A Photo Banner:
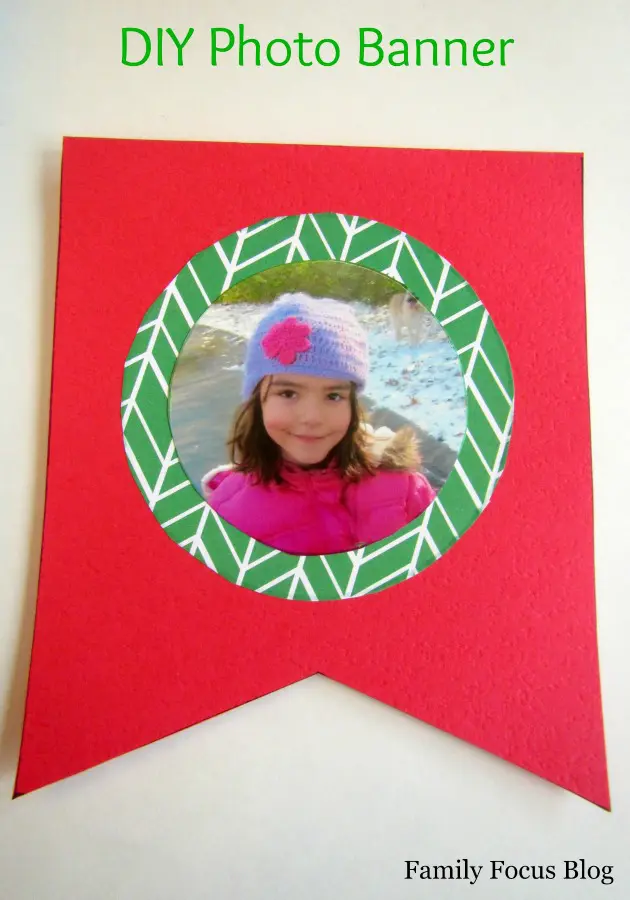
- Begin by creating the banner pieces. I used my ruler and pen to mark out rectangles that were 5 inches by 6 inches. You need 10 rectangles for this banner.
- Next, I marked out the triangle area that would be removed. One inch up from the bottom of the rectangle, mark the spot right in the middle of banner piece. In other words, measure 2.5 inches from the side and 1 inch up and put a dot. Then connect that dot to both corners. Once I measured the first one I cut it out and then traced the rest.
- Cut the triangle out of each rectangle and you will have your bunting pieces.

- Make 10 large circles on the back side of your printed scrapbook pages. I used the top of a cup to trace the circles that measured 3.5 inches across. Cut them out.
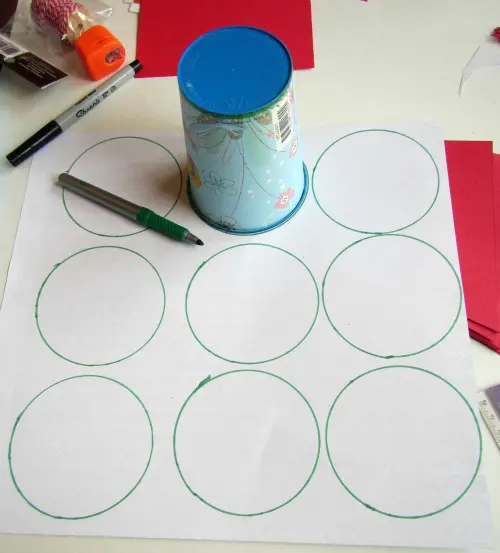
- Make 7 small circles on plain white typing paper. I used the bottom of the same glass to trace the smaller circles and they measured 2.75 inches. Cut them out.
- Make 3 small circles on the photos. I used one of my already complete circles to cut trace and cut out the photo circles.

- Use the glue stick to glue the small circles to the center of the large circles. Before you glue each white circle drawn the the capital letters, one for each circle, “B-E-M-E-R-R-Y”.
- Now glue the large circles to the center of the banner pieces.
- Hole punch each top corner of the banner pieces.
- Measure your string (or ribbon) to the length of your mantle.
- Slide the banner pieces onto the string and attach to the mantle. All done!
Conclusion
Making a photo banner is a creative and DIY project. It allows you to express your personality and style by choosing the photos, arranging them, and adding decorative elements according to your taste. reating a photo banner is often an affordable way to decorate a space. It requires minimal materials, and you can use existing photos or print them inexpensively.
Once you’re satisfied with the arrangement, your DIY photo banner is ready to be displayed. It also makes for a thoughtful and personalized gift for special occasions. You can easily personalize it based on the theme or the event you are celebrating. Have fun creating your DIY photo banner! Do you like using photos to personalize your holiday home decor? Do you think you will try this DIY photo banner?
Related Posts:
Easy DIY Photo Ornaments Craft Tutorial
Jennifer says
so cute! i really should bget better at printing photos. I don’t know when the last time I actually did that was. I use to love scrapbooking and now, I never do it 🙁 This looks like the perfect craft to get me back int the swing of having photos printed and having fun with them!
Jenna Wood says
This turned out great- I can’t even tell it’s handmade! We try to get photos printed once a month since it’s so cheap and convenient at CVS!
Dawn Lopez says
What a great idea! There’s nothing better than personalized decor. Your photo banner instructions are really easy to follow too. Thanks for sharing. 🙂
Candy O says
What a great idea! I love that the banner has a few other designs with the paper, it’s not just plain. Fabulous craft that the whole family can help with too!
Victoria Sconion says
This is so cute! I’m so not that creative, but I would love to create something like this for the kids’ bday!
dawn says
what a great dyi idea. it is so well made and i love the presentation. thanks so much for the share.
Brandy says
This is a super cute and super easy way to make a banner to decorate your home. We have a mantle above a fireplace (that we don’t use) maybe have to make these for the munchkins to hang up!
Liz Mays says
Those are adorable. A banner is cute anyhow, but to add photos makes it even better!
Mama to 5 blessings says
What a clever and cute idea! I so need to make this for my kids, this would be great to tweek as a birthday banner too!