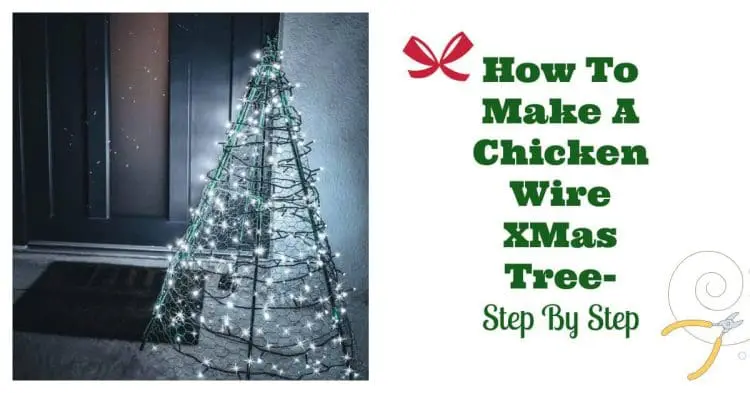
The holidays are just around the corner and we’re excited to decorate our homes with festive lights and seasonal ornaments. Some of us already have a Christmas tree at home, but this DIY project is something you probably haven’t seen in anyone’s yard yet. If you have some chicken wire laying around unused, this is the perfect time to create something memorable! Guaranteed, you will have the most unique addition to your Christmas display. This chicken wire Christmas tree is the perfect way to brighten up any porch and bring holiday cheer!
Wire Christmas Tree Frame DIY Craft Project

The idea for this adorable tutorial on how to make a Christmas tree out of chicken wire was shared with me by WireFence.co. This will go great with your other rustic Christmas tree ideas. It is a great DIY outdoor Christmas decoration.
Craft Supplies you’ll need:
- Chicken Wire (120cm x 150cm)
- 6 Green Steel Plant Stakes (35.5 in long each)
- Christmas Snowflake String Lights, 20 Ft (affiliate Amazon link below)
- Tying Wire (8 ft long)
- Lacing Wire
- Green Spray Paint
- Tools (Pliers, Wire Cutters, Protective Gloves)
How To Make A Christmas Tree Wire Form Out Of Chicken Wire
Create the conical shape of the tree
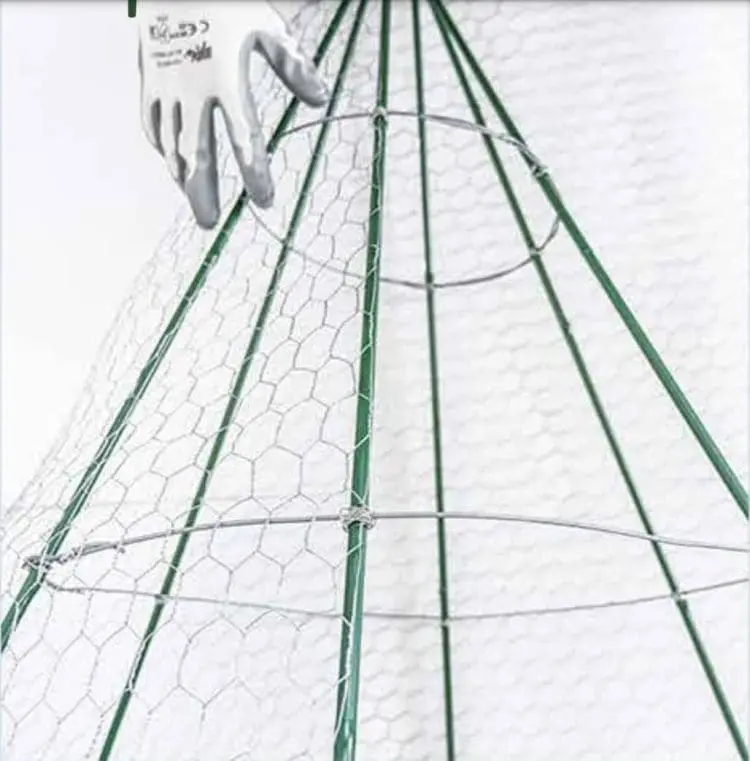
First, make the two hoops that are needed to create the cone shape of the tree.
Do this by cutting an approximately 60 inch long piece and a 40 inch long piece of tying wire for the top and bottom hoops, respectively.
Then, bend each tying wire into the shape of a hoop with a few inches of overlap.
Secure the hoops into place by tying the overlap shut with thin lacing wire.

Tie the bigger hoop at a 8 inch distance from the bottom of the first stake with the lacing wire.
Place the smaller hoop onto the same stake at 15 inches from the top and secure it with the lacing wire.
Next, place a second stake on the opposite side and tie it to both hoops at equal distances.
Repeat the same steps of adding the remaining stakes at even distances and securing to both hoops. Make sure to always place opposite stakes.
Use the thin lacing wire to tie the top of the stakes together in order to give stability to the structure. Just wrap the lacing wire around the plant stakes to hold them in place. Now you have your DIY wire Christmas tree form, but adding the chicken wire rounds it out and makes it easier to decorate.

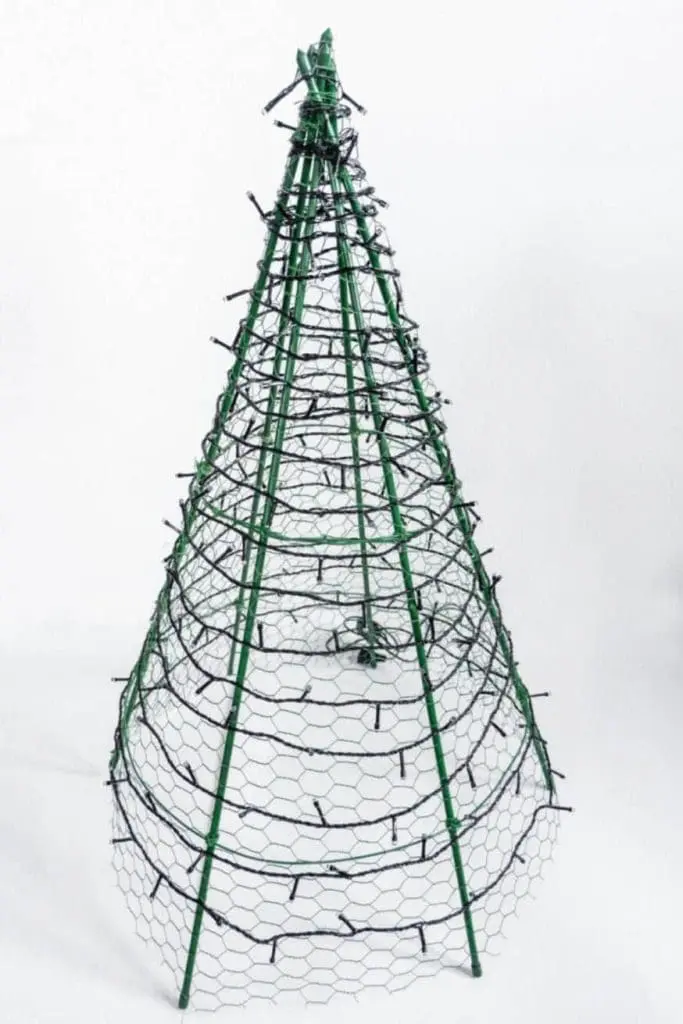
Adding the chicken wire
Roll out a length of chicken wire flat on the work surface. Then lay the cone shaped structure on it and wrap the mesh around it. Use a permanent black marker to mark the chicken wire or make note of the measurements needed to wrap the structure completely. This will be about approximately 50×60 inches.
Cut chicken wire with wire cutters or tin snips.
Use the lacing wire to secure the chicken wire mesh to the frame making sure it stays tightly stretched over the steel stakes as you go.
After the chicken wire has been secured to each stake, you can cut any excess chicken wire off the bottom of the structure.
In order to achieve a precise cut, you can use a ruler with a straight edge to guide you.

Give the structure an even coat of green spray paint to imitate a real pine tree. Let it dry for an hour. This step is optional because you can’t really see it that well at night but it makes the DIY wire Christmas tree better for daytime viewing!
Decorating The Chicken Wire Xmas Tree
Wrap the strand of Christmas lights around your structure. Start with the end of the lights without the plug at the top and make your way down in spirals. The lights themselves may work with the mesh to stay in place. If not, use some lacing wire to secure the lights every now and then.
Your chicken wire Xmas tree should now be ready so you can plug the lights in. It is the perfect DIY outdoor Christmas tree decoration and goes great on the porch or in the yard. Plus, it is easy to customize the size of this wire Christmas tree.
Conclusion
Making your own DIY wire Christmas tree is a fun and creative way to add a personal touch to your holiday décor. Not only is it a budget-friendly project, but it also allows you to customize the size, shape, and decorations to suit your style. Whether you keep it simple and elegant or bright and whimsical, your handmade tree will bring a sense of joy and accomplishment to your seasonal setup—and maybe even start a new holiday tradition.
I hope you enjoy having your very own chicken wire Christmas tree. Put on some Christmas music and get those holiday spirits flowing! I’d love to see how your DIY wire Christmas tree came out! Share it with me on social media @familyfocusblog!
Related Posts:
Rahul Bakayala says
I love this outdoor Christmas tree decoration. This chicken wire tutorial is going to help me to impress my kids, Lol, thanks.
Kitch says
Wow, wire Christmas trees is a super idea. We should celebrate Christmas in our own style. This wire christmas tree frame is big. I will make a small x-mas tree wire form with your steps. Will hang some beads, bells too.
Rose says
This Chicken Wire Christmas Tree Tutorial is a festive masterpiece that transforms a humble material into a dazzling holiday centerpiece. Like a sculptor shaping a masterpiece from clay, this DIY guide turns a simple roll of chicken wire into a stunning Christmas tree. With step-by-step instructions, it’s not just a craft; it’s a journey of creativity and joy. This tutorial is the holiday magic we all need, proving that with a touch of imagination and a bit of wire, you can bring the spirit of the season to life in a truly unique and charming way. Get ready to weave your own Christmas enchantment!
Vemuri Venu says
We are from India. Till today, I never made a Christmas Tree. But now I will follow your guide and prepare an outdoor wire christmas tree. Thanks.
Diana says
Wow! This is so beautiful. I love this outdoor Christmas tree decoration.
Anita says
Amazing wire Christmas tree form tutorial! I made this DIY wire tree and it was pretty easy. The wire Christmas tree with lights looks so good. Thanks.