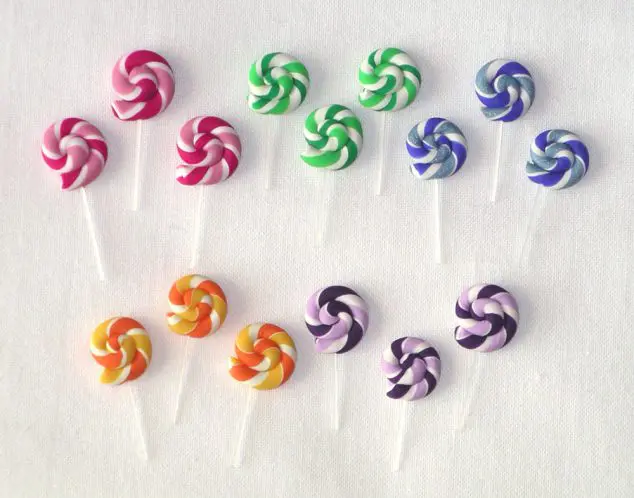
Clay crafting is a type of sculptural or modeling craft that involves shaping and forming objects from various types of clay. It’s a versatile and creative craft that can range from simple, fun projects like making beads or small figurines to more complex art forms such as pottery, ceramics, and detailed sculptures. This craft tutorial was provided by Tonya with little T studio. She shares with all of the parents out there, fun and easy crafts for kids, like this Polymer Clay Lollipop. I think you will find this polymer clay tutorial easy to follow and fun to make. This adorable lollipop craft can be used in lots of fun ways from polymer clay earrings to magnets to doll house props. She’ll provide step by step polymer clay instructions to make this craft lollipop fun and easy to accomplish.
A little about Tonya, your craft instructor:
I became interested in sculpting with clay early on at the age of seven. Throughout the years I enjoyed making miniature works of art, giving them to family and friends as gifts. As word spread I started my own business selling miniatures successfully for many years. As time went on I became a Graphic Designer and added children’s wall art and digital stationery to my list of products. I’ve had great fun teaching kids of all ages (and fun adults!) how to sculpt cool little polymer clay items. They have had so much fun, I thought I’d share my polymer clay tutorials. Plus, there are lots of benefits of arts and crafts for kids. Here are some wonderful polymer clay projects for everyone who wants to learn.
What is Polymer Clay?
Polymer clay is non-toxic, easy to use, brightly-colored craft clay. It is man-made clay using a plastic, polyvinyl chloride (PVC) base. It is a popular choice for crafting because it stays continually soft while being handled and sculpted. Then it can be baked at low temperatures (usually around 265°F to 275°F or 130°C) in a home oven and retains both its color and size. Plus, this craft supply is so reasonably priced! Here is an affiliate link to an amazing set on Amazon.
Polymer clay is a type of modeling clay that comes in a wide range of colors that can be mixed, marbled, or layered to create various effects. Once baked, it’s lightweight, making it ideal for wearable crafts like earrings, pendants, and charms.
Polymer Clay Instructions For Clay Lollipop Craft (Which You Can Use As Magnets or Earrings)

Craft Supplies you will need:
- An old baking (cookie) sheet (that will never again be used for food)
- A piece of parchment paper
- A working mat or placemat
- Polymer clay slabs (If you want to make the ones in the photo below , you will need light pink, dark pink, and white clay)
- Plastic knife
- Scissors
- Plastic clothing tags
- Ruler
- Oven
Polymer Clay Lollipop Craft Step By Step Instructions:

Step 1
Break off some small pieces of clay to get started. Then, take a piece of clay and roll a log of white clay that is approximately 5 inches long and ¼ inch in diameter. Do the same with the light pink and dark pink polymer clay pieces except roll those to approximately 4 mm in diameter.
Step 2
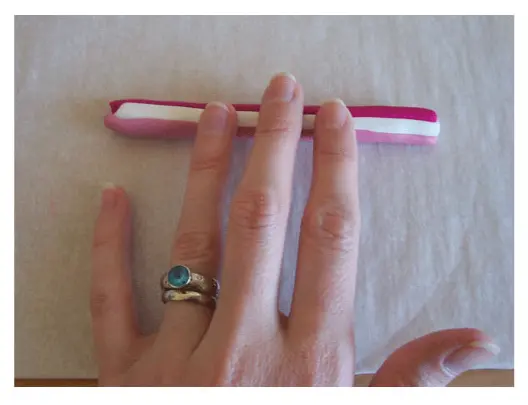
Line up the logs of clay and cut the ends so they are all the same length.
Step 3
Place the white clay in the center with the light pink and dark pink on either side. Press together to form a bond and begin gently rolling the log. Roll until it forms one smooth log and is thin enough for your preference. I usually roll mine down to 2-3 mm in diameter.
Step 4
Are you ready? This is the best part! Take the log of clay in one hand and while holding it straight, take the other end with your other hand and begin to twist it. Watch the cute lollipop swirls appear before your very eyes! How cool is that?
Step 5
Cut pieces of the lollipop to the length you desire. If you’re going to turn these into earrings you probably want to cut them 1 1/2 inches long. Dollhouse miniature lollipops 1 inch long or less. Magnet lollipops 2 inches long.
Step 6
Take your lollipop stick and roll it up like a little snail to make the lollipop circle.
Step 7
Cut out 1/2 inch pieces of your clothing tags and carefully insert them into the bottom of your lollipop top.
Step 8
Place the polymer clay lollipop on the parchment paper on your cookie sheet and bake according to the clay package instructions. I usually bake mine for 15 minutes however you will need to follow the clay package instructions for optimal safety as each brand is a bit different.
Making Cool Stuff With Your Polymer Clay Lollipop Crafts:
If you want to turn the clay lollipops into polymer clay earrings or magnets simply glue the appropriate hardware to the back of the lollipops after they have finished cooling and you’re all set! If you were going to use these in a little dollhouse, then you’re already done! To watch her polymer clay technique check out her tutorial shows.
Want to see a FREE video tutorial of the above steps? Here you go! And click on the YouTube Channel itself to subscribe and check out more polymer clay tutorials.
Cute Clay Lollipops Conclusion
Polymer clay can be used to create anything from simple beads to complex sculptures, and it can be sanded, drilled, and painted after baking to add further details. It stays soft and workable until baked, allowing for intricate detailing and shaping. I hope you enjoyed learning these basic techniques for crafting with polymer clay.
Happy Crafting! Have you ever tried a polymer clay tutorial before? Do you think you will try this craft tutorial for polymer clay lollipops? I’d love to see what you make! Tag us @familyfocusblog
Related Posts:
How To Make Hot Air Balloon Decorations
