Looking for cool crayon art ideas? This is a step-by-step tutorial for DIY crayon melted art decor! It makes a great project for anyone looking to add some color to their walls. This is a safe and fun DIY decor project for the kids as well. There are endless options with melted crayon art designs; you can vary the color scheme, size of the canvas, and the subject. This tutorial is for how to make a melted crayon art silhouette of your state but you can always choose any image you would like for the silhouette! This is a great way to use crayon wax to create you own work of art. It is so much fun!
Melted crayon art ideas are a fun and creative way to make colorful paintings or decorations using melted crayons. To create melted crayon art, you’ll need crayons, a canvas or other surface, a hot glue gun, and a hairdryer or heat gun. Melting crayon art has become quite popular as allows for a high level of creativity and self-expression. Artists can experiment with different colors, techniques, and designs to create unique and personalized pieces. Additionally, crayon melting art is relatively easy and inexpensive to create, making it accessible to people of all ages and skill levels.
This post was first published February 16, 2015. I have made a few updates and I am republishing it here for my new readers to enjoy.
DIY Crayon Art: State Silhouette

Melted crayon art is a really fun way to experiment with low cost art supplies and you can do any number of types of projects. Most of these types of art projects will involve some splatter so it may be a good idea to do it outside. Cover your work area with newspaper or parchment paper.
A favorite art project for younger children is having them line up the crayons along the top of the canvas. Then the adult can use a hot glue gun and glue them down along the top of the canvas. Kids can use use a blow dryer under adult supervision to melt crayons downwards over the canvas.
This crayon art tutorial is meant for adults and older children as it is more complex. When finished, the end result crayon art project will look great as a legitimate part of your home decor. Who knew melted crayons could be so classy?
Art & Craft Supplies For Crayon Projects:
- Canvas
- Crayons (remove crayon wrappers)
- Hair dryer
- X-acto knife
- Acrylic paint
When you do melted crayon art projects, does the brand of crayons matter? Yes, the brand of melted crayon wax can make a difference in melted crayon craft projects. Higher-quality crayons (like Crayola) tend to have more pigment and less wax, resulting in more vibrant colors when melted. Cheaper crayons may look dull or create a waxy residue. In addition, different brands melt at different temperatures. Crayola crayons melt evenly and smoothly, while off-brand crayons may clump or separate into wax and pigment.
How To Make Melting Crayon Art Silhouette:
Follow these easy steps to make your own melted crayon art canvas.Use a drop cloth or piece of cardboard to protect your work surface.The colorful wax will splatter while you work.Wax cools and hardens quickly which can make it hard to remove.
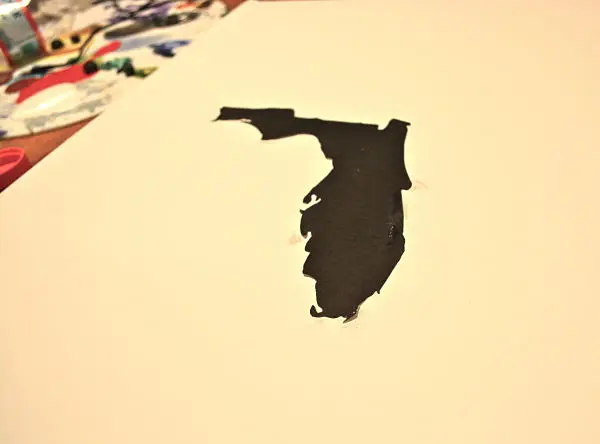
Affix Printable Silhouette to Canvas
First, you are going to need to find or print out a silhouette of a shape. Just use a search image to find a printable of the image you have in mind. I chose my home state, Florida!
Cut out the silhouette out of the piece of paper. To keep it down while we add color you can place a piece of tape on the back of it or use a glue stick around the edges of the silhouette image.
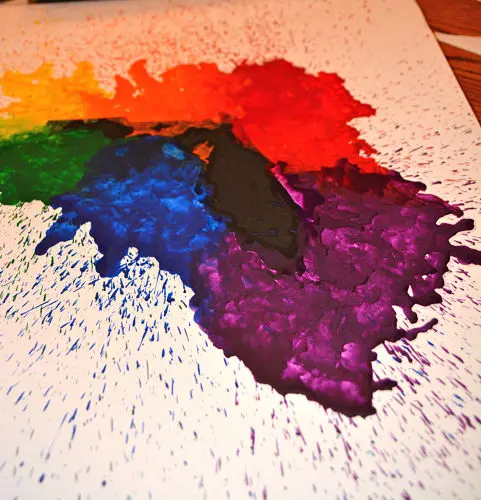
Melt Crayons
Peel the wrapping off of the crayons. You can use any colors you want. I went with basic bold colors. However, you could choose colors in order to match the decor of the room the canvas will go in. When the crayons melt, you won’t be able to tell if they were old crayons or crayon pieces so don’t worry about that! I don’t suggest crayon shavings because they will blow away unless you are using a heat gun instead of hair dryer.
Turn hair dryer on the lowest setting and blow hot air at the crayon. Then blow the melted wax away from the silhouette.
Tips: Put the hairdryer on low so the wax doesn’t fly everywhere. To get the splattered look, lightly tap the crayon while the hairdryer is pointed in the desired direction.
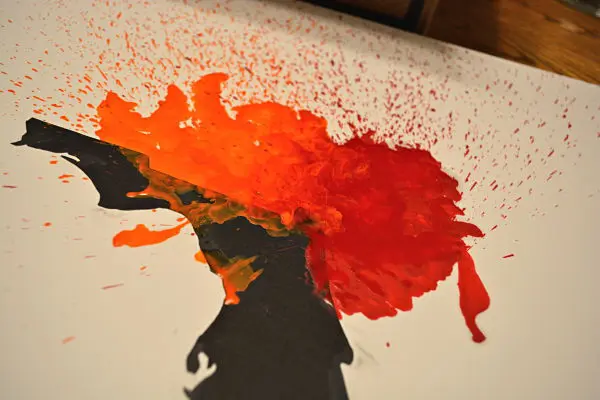
Tips: It is easy to mix the crayon colors wax so you get a nice transition between colors. Keep the wax on the canvas hot and go back and forth between the two colored crayons.
Remove Paper For Silhouette
Once you are done with the crayons, use the X-acto knife to lightly cut along the edges of the crayon silhouette. This will help us pull up edges and pull off the picture.
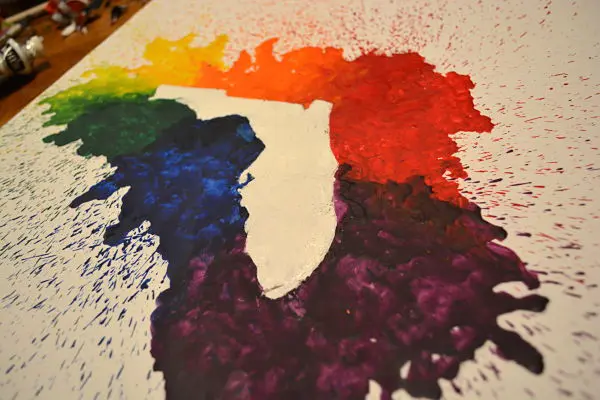
If any wax seeped under the silhouette use an acrylic paint the same color as the canvas and go over the areas where wax should not be. Your crayon silhouette is done!
Melted Crayon Silhouette Art Designs On Canvas

Now, you are ready to hang your melted crayon art silhouette on the wall and enjoy! I hope you enjoyed these crayon art ideas. I think they are so much fun to make! These cool art crayon crafts also make great gifts. In addition, the process of creating crayon melt art can be therapeutic and relaxing for many people. The act of melting the crayons and watching the colors blend and flow can be calming and meditative.
Melting crayons art can be used to create a wide range of art pieces, from abstract paintings to intricate designs. Artists can experiment with different techniques, such as blending colors, creating drips, or using stencils, to achieve different effects.
Conclusion
Melted crayon art can be a fun and colorful way to express your creativity, and there are many variations and techniques you can try to create different effects. This simple crayon silhouette with melted wax creates interesting textures and patterns, adding depth and interest to the artwork. Melted art crayons produce vibrant, colorful designs that can be visually striking. Have you ever used this DIY melted crayon art method before? Would you ever try this tutorial for how to make a melted crayon art silhouette? If you do be sure to share your beautiful pieces with us #familyfocusblog. We’d love to see your crayon canvas!
Related Posts:
angela@spinachtiger says
I love your crayon art ideas. We have so many broken crayons and crayon shavings that the boys don’t use. This is a perfect snow day craft diy art project!
Kate says
I’ve made a couple of projects with melted crayons. I made one for mother’s day for my sister. This colorful wax art activity turned out really pretty.
Nicky says
Crayon art is such a fun and creative activity! This is a great project for older children and adults.
There are also a variety of ways to melt crayons, but a popular method for younger kids is using a piece of wax paper and a baking sheet to keep things neat. Just shave a pack of crayons, place the shavings between two sheets of wax paper, and gently iron over them to create a cool stained-glass effect.
Art Lover says
I absolutely love this trend; I saw it on Tiktok before, My kids and I created it with broken crayons and they enjoyed every second!
And Same Day Custom printed their canvas on one of my t-shirts; they sent it that same day.
Sabina Holt says
Exploring melted crayon art is a fantastic way to unleash creativity! This tutorial offers a vibrant twist to traditional techniques, inviting artistic experimentation. Thanks for sharing your colorful creations. These creative ideas will be the perfect addition to my weekend plans.
Hossein Moshiri says
This tutorial offers a delightful approach to creating vibrant and visually captivating artwork through melted crayons. The combination of colors and the use of silhouette techniques provide a unique and artistic twist to traditional crayon art projects. The step-by-step instructions provide clear guidance, making it accessible for both beginners and experienced artists to explore their creativity. By harnessing the transformative power of heat to melt crayons, this tutorial unlocks a world of possibilities for crafting colorful and dynamic pieces that are sure to impress. Whether for personal enjoyment or as a creative outlet, this tutorial inspires individuals to embrace experimentation and embrace the beauty of melted crayon art.
Skardutourandtravel says
This tutorial presents a fun and creative way to craft eye-catching artwork using melted crayons. By blending vibrant colors with striking silhouette designs, it adds an artistic flair to traditional crayon art. The step-by-step guidance makes it easy for both beginners and experienced artists to follow along and bring their ideas to life. Using heat to melt crayons opens up endless possibilities for creating bold, dynamic pieces. Whether you’re looking for a relaxing hobby or a fresh artistic challenge, this tutorial encourages experimentation and showcases the beauty of melted crayon art.
Advocare says
This melted crayon art tutorial is fantastic! The step-by-step guide makes it so easy to create vibrant, unique pieces, and the tips on colors and techniques are super helpful. Thanks for sharing such a creative and inspiring crayon project!
Kidzonia says
This is such a fantastic idea — combining art, creativity, and personalization all in one project! I love that you can customize the silhouette to anything meaningful, from a state outline to a favorite animal or shape. Such a great way to involve kids while also creating a unique decor piece for the home. Definitely adding this to our weekend craft list!