When I am shopping, I always see cute t-shirts with funny sayings on them. What if I told you that you could make your own shirt or tank top with whatever saying you want?! That is right. You can easily make DIY t shirts with a bleach pen for any theme and they are the perfect DIY gift or you may love them so much you keep them for yourself. Of all the bleach uses, a DIY bleach pen t-shirt has to be the most fun!
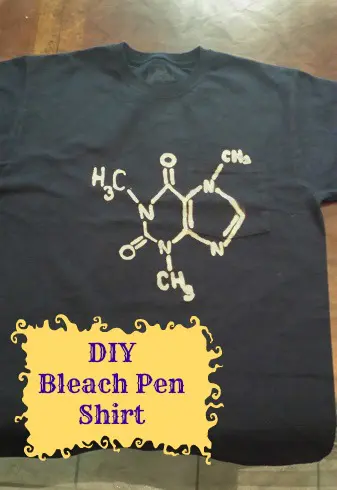
You can use any saying, theme, hashtags, or simply whatever you personally want on the Bleach Pen T-Shirts. My boyfriend saw a shirt online of a caffeine molecule on it and loved it. So I told him, “Let’s make the shirt!” In the process of making this DIY bleach pen caffeine molecule t-shirt, he was very impressed with how it turned out. Check out how simple the process is and you will be making your own DIY bleach pen t shirts in no time!
This tutorial was first published on July 30, 2014. The Clorox Bleach Pen was discontinued a while back, but there are a few good substitutes. I have made a few updates to the article and republished it here. I will share bleach pen alternatives with you as well as how to make your own t-shirt designs.
DIY Bleach Pen T Shirt Craft Tutorial
Looking for a fun and budget-friendly way to give an old t-shirt a fresh new look? A bleach pen is the perfect tool for turning a plain colored shirt into a one-of-a-kind design. With just a little creativity, you can doodle patterns, write words, or sketch unique artwork right onto fabric, and the bleach will lighten the areas you draw for a striking contrast effect. This easy DIY project is beginner-friendly, requires minimal supplies, and leaves you with a wearable piece of art that reflects your personal style.
Craft Supplies For Bleach Pen T-Shirts:
- Any color t-shirt you want to use (except white). Fun colors are always great!
- Clorox bleach pen
- Large cutting board, or piece of thick cardboard
- White pencil eyeliner
- Plastic shopping bag, or garbage bag
When it comes to the Clorox bleach pen, they have been discontinued but here are two alternatives. First you can use my affiliate link here to order a close substitute on Amazon. Or you can make your own DIY bleach pen. For the homemade version – mix 1 part bleach + 4 parts water, and apply with a small, thin-tipped squeeze bottle or cotton swab.
Step By Step Homemade Bleach Pen T Shirts For Coffee Lovers And Chemistry Lovers:
If you love coffee as much as you love chemistry, this DIY project is the perfect blend of both worlds! Using a bleach pen, you can turn a plain dark t-shirt into a wearable work of art by drawing the iconic caffeine molecule. It’s a simple way to show off your passion, spark conversations, and create a one-of-a-kind shirt that celebrates science and your favorite cup of joe.
Step 1
The first step in making bleach pen t shirst is to figure out what you want on your t-shirts. Make sure you draw what you want out on a sheet of paper and are satisfied on how it turns out. This way you can practice and perfect what you want to draw.
Step 2
Set up your work area.
Safety First: Whenever you’re working with bleach, be sure to protect yourself and your space. Wear old clothes or an apron, and always use gloves to avoid skin irritation. Work in a well-ventilated area or outdoors so you’re not breathing in strong fumes, and cover your work surface with plastic or cardboard to protect it from accidental spills. Keep paper towels or a damp cloth nearby for quick cleanups, and never mix bleach with other cleaners. Once you’re done, wash your hands thoroughly and rinse your finished shirt well before wearing.
Step 3
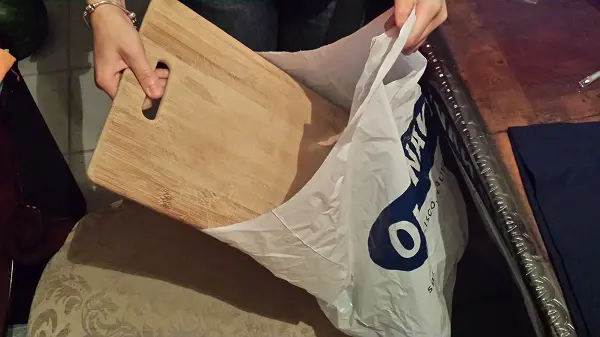
Lay out your plain t-shirt or tank top on a flat surface. Take your cutting board and cover it with the plastic shopping bag. Once the cutting board is covered, slide the board with the bag in the shirt. This prevents the bleach from bleeding onto the back of the shirt and protects the board.
(If you are using a tank top, use tape to strap down the straps of the top or have someone hold them down.)
Step 4
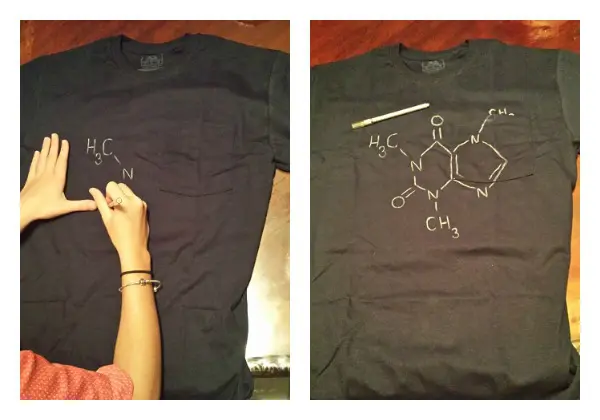
Here is where the white pencil eyeliner comes in handy! Use the white eyeliner to draw out your design (you would want the design across the chest.) This helps you so much instead of using the bleach pen with a free hand. (Don’t worry the eyeliner comes off when you wash it!)
Step 5
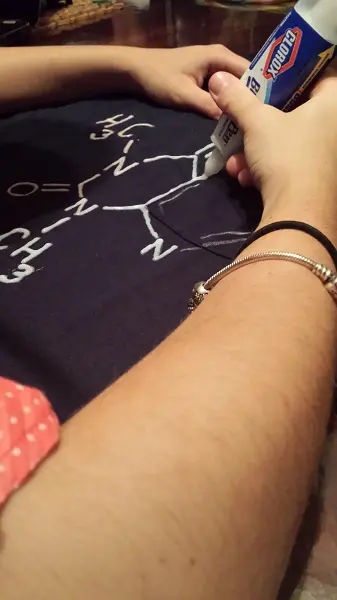
After you have draw out your design with the white eyeliner, use the bleach pen to trace over the eyeliner. See no free handing! Yay!!
Step 6:
Once you are finished, carefully pull the cutting board out of the plastic bag of the t-shirt or tank top. Make sure the plastic bag is left in the shirt so the bleach doesn’t bleed onto the back of the shirt.
Step 7
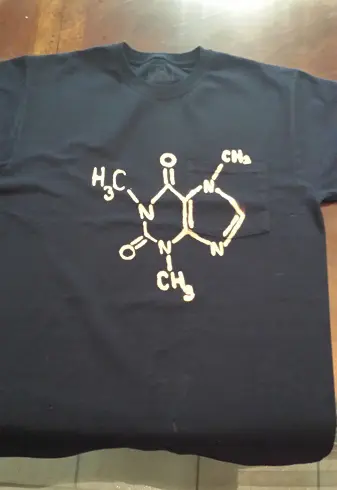
Let the t-shirt or tank dry (up to 1 hour). The bleach will turn from the thick cream to a gel- like substance.
Step 8
Repeat the process if you want to make more DIY bleach pen t shirts or tanks!
Step 9
Once the bleach design has dried and you’re happy with the look, it’s important to rinse out any remaining bleach so it doesn’t continue to eat at the fabric. First, rinse the shirt thoroughly in cold water to remove excess bleach. Then soak it for about 10–15 minutes in a mixture of water and vinegar (about 1 cup vinegar to a bucket of water) to help neutralize the bleach. After soaking, wash the shirt by itself in the washing machine with a mild detergent, using cold water. Finally, dry it as usual — and your custom design is ready to wear!
I hope you enjoy your custom DIY bleach pen t shirts!
Conclusion
Trying this bleach pen t-shirt tutorial is a fun way to get creative, upcycle a plain shirt, and make something totally unique to your style. It’s simple, inexpensive, and gives you the freedom to play with designs — whether it’s a caffeine molecule for science lovers or your own doodles and patterns. Plus, it’s a hands-on project that leaves you with a wearable piece of art you’ll be proud to show off.
I hope you love this idea for t-shirts for coffee lovers in your life. This DIY t-shirt design can be accompanied by creative coffee-related designs, such as coffee cups, coffee beans, coffee makers, or humorous illustrations related to the theme if you are giving it as a gift.
Now that you know how to make your own bleach pen t shirts, will you make your own custom shirt? It can be a great way to upcycle a t-shirt. How about making them as gift or a during a party? Let me know how yours turns out and if you liked it! Tag us @familyfocusblog so we can see! After all, “All You Need is Love… And Coffee!”
Related Posts:

Uplifting Families says
This is a cool idea. Thank you for sharing this fun coffee t-shirt design.
Lisa Ranieri says
No problem! I want to share with you if you use an undershirt material type shirt, the bleach will bleed and you will not get the best results. Make sure to use a cotton shirt. I got the one in the picture from Walmart for $3.00 It worked great!
Lauren says
What a creative way to upcycle an old t-shirt! Using bleach for fabric art gives such a bold contrast, and I really like the idea of making personalized designs that reflect your interests. This looks like a simple DIY project that would be fun to make and gift!
Maria says
So fun and clever, especially the tip with the white eyeliner for sketching before bleaching
I’m inspired to make one for myself ☕
Navbharat says
What a creative way to upcycle an old t-shirt! Using bleach for fabric art gives such a bold contrast, and I really like the idea of making personalized designs that reflect your interests.
Pearl Marry says
This is such a clever and creative idea! I love how you used a bleach pen for precision—it looks so professional. The caffeine molecule is a perfect choice for science lovers and coffee fans alike. Your step-by-step instructions make it feel totally achievable. I can’t wait to give this a try. Thanks for sharing such a fun and unique DIY project
Shahbaz says
Great insights, thanks for sharing this post! I really liked the way you explained fabric care tips so the bleach doesn’t run.