I have been headboard shopping for a while it and it can be hard to find just what you want. It can be even harder to shell out all those big bucks when you do! That is why I love the idea to make your own headboard. I am so glad to share with you this headboard diy project that can both be customized to fit your decor and save you some money! I got the idea for this from Home & Family and I have been given permission from them to print a tutorial for Ken Wingard‘s DIY upholstered headboard. This cheap DIY headboard project will only cost you about $90 and take about 4 hours! Home & Family airs weekdays at 10 am on the Hallmark Channel. You can click the link to see episodes and clips.
Cheap DIY Headboard Project (Upholstered Fabric With Wood Frame)
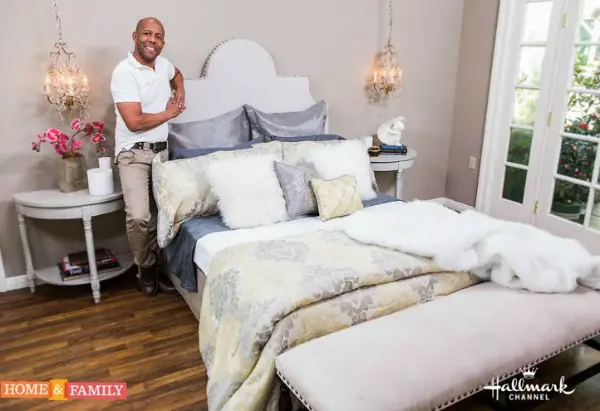
H&F Photo Credit: Copyright 2015 Crown Media Family Networks/Photographer: Jeremy Lee
This DIY headboard is the kind that uses padding and fabric to create an upholstered look that is soft and comfortable to lean back against. I love the soft, cushy padded headboard look and it can be customized with any fabric to match your existing color scheme. A new headboard can cost around $2000 so you will love the savings on this custom headboard for your size bed.
Here’s a step-by-step guide to making a DIY upholstered headboard. First you will want to gather your DIY supplies.
DIY Fabric Headboard Materials:
- 2 sheets of 4×8 plywood
- 2 sheets of rigid insulation foam 2″ thick
- Adhesive (like Liquid Nails)
- Cotton drop cloth (or 2 to 3 yards of fabric of choice for a queen size bed)
- Scissors
- Measuring tape
- Staple gun and staples
- Upholstery tacks (or decorative nail heads)
- Bread knife
- Quilted Batting
- French Cleat Mounting Hardware(optional)
All of these supplies can be picked up at your local hardware store or Home Depot. That is unless you’d like to use a fancy fabric, which will require a trip to the fabric store as well.
Directions for Creating the Headboard DIY Base:
- To make the wood frame for the headboard you will need a full 4′ x 8′ sheet of plywood. That is 48″ x 96″ and you can cut the long side down to 60″ because that is the width of a queen bed. (A twin bed is 38 and king bed is 76 inches.) Then you can either keep it simple and rectangular or do what he Ken did and use a trashcan and a bucket to trace a fancy outline on to the plywood and cut it out with a jig saw.
- Use adhesive to attach the insulation foam to cover the plywood and allow to sit and bond.
- Trace the already cut headboard and use a small saw or bread knife to cut foam down to match the shape of the plywood headboard.
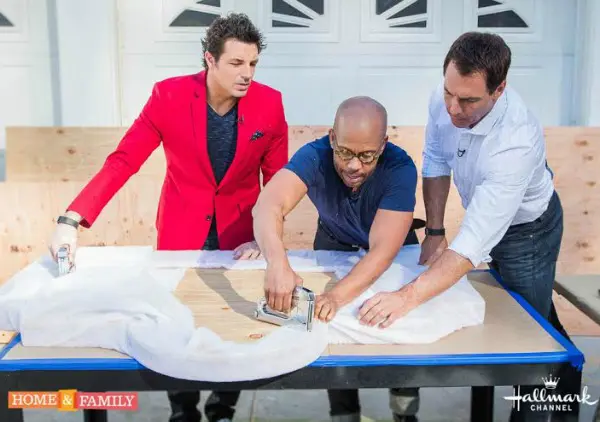
- Lay the headboard down foam first on quilted batting. Pull the batting tight and cover the entire headboard using a staple gun to secure the batting to the backside (the plywood side.) Start at the center of each side and work your way toward the corners.
- Make sure corners are nice and tightly stapled to the back of the headboard. You can cut off the excess batting.
How To Make A DIY Headboard With Upholstery:
Ken used a cotton drop cloth to get the rough, natural European Linen look that is so popular.
- The first step in upholstering the headboard is to iron your drop cloth (or upholstery fabric of choice).
- Spread the upholstery fabric flat, pattern side down (if there is a pattern).
- Lay headboard face down (batting first) on the cloth.
- Pull drop cloth around headboard so it is all covered. Staple the fabric to the back of the plywood, ensuring it’s smooth and free of wrinkles.
- Work your way around all sides, neatly folding and stapling the corners last. Again, make sure corners are nice and tight when stapling. Cut off excess fabric cloth.
- Use an extra 6 inch strip of fabric with folded hems to create a trim for the top of the headboard to hide any imperfections. You can use hot glue to attach this for a nice clean look.
- Finally, secure around edges of bed with upholstery tacks (or decorative nailheads) giving it an extra stylish studded look.
- Hang on the wall using a French Cleat. Push the bed frame against the headboard and lock wheels into place.

Watch the video here
Now you’re ready to enjoy your custom, handmade headboard!
Conclusion
Creating a DIY upholstered headboard is not only a cost-effective way to enhance your bedroom but also a rewarding creative endeavor. By designing your own headboard, you can tailor it to fit your style, whether that’s modern, rustic, or elegant, and choose fabrics, colors, and textures that complement your space. The process allows you to express your personality while saving money compared to store-bought options.
The steps to create your headboard—measuring, assembling, padding, and upholstering—are straightforward with the right tools and a bit of patience. It’s a project that transforms your bed into a focal point while adding comfort and charm. Whether you’re refreshing a room or creating a custom piece, this DIY approach is a fun, practical way to elevate your space and take pride in something you made yourself.
I love how you can always repurpose the headboard to match any decor changes. This cheap DIY headboard looks like a very expensive one you might find at retailers such as Pottery Barn. Do you think you will try this headboard diy project? Share your DIY headboard ideas on social media and tag me @familyfocusblog
Related Posts:
Nicole B. says
I need to make something like this for our guest bed. It doesn’t have a head board and it would look so much more decorated in that room if it did. Thanks for posting about this diy headboard tutorial!
Sharon Ballantine says
Upholstery projects like this can be a fun project for your budding designer, or that you can do with your kids, depending on their ages and interest levels of course. Kids of any age can choose fabrics and colors. By working on the step-by-step process together you are creating great family memories and helping to inspire their creativity.
Corina Ramos says
I love the nailhead trim. I might try this shape of the headboard for my son’s bed. Thanks for showing us how it’s done.
Nicole says
How do you attach to the wall/ bed when it’s done?
Scarlet says
You can attach it to the wall using a cleat or zclips. Here is a youtube video with some good tips for how to mount your bed frame on the wall https://youtu.be/Dnch7FTDR9Q